# CloudFormation IaC
### What is CloudFormation?
Think of CloudFormation like IKEA instructions for AWS.
* Instead of manually clicking around to set up servers, databases, or networks in AWS,
* You write (or use) a template file (YAML or JSON),
* And AWS builds everything for you automatically.
* You write a template → a list of what you want (e.g., an EC2 server, an S3 bucket, a VPC).
* CloudFormation reads the template → understands the resources.
* AWS provisions them in the right order → like creating a VPC before launching the server inside it.
* You get a “stack” → a collection of all those resources that CloudFormation manages as one unit.
* Automates AWS setups → no more manual clicks.
* Keeps consistency → same setup can be recreated in multiple environments (Dev, Test, Prod).
* Easy updates → change the template → CloudFormation updates your resources.
* Rollback on errors → if something fails, it undoes the changes so your setup isn’t broken.
Why it matters
* Makes templates reusable and dynamic across environments.
* Avoids hardcoding values like ARNs, VPC IDs, or AMIs.
* Supports conditional logic, mapping lookups, and inter-stack references.
How it works
1. Use intrinsic functions in your template YAML/JSON.
2. CloudFormation evaluates the function at stack creation or update time.
3. The output/value is automatically used in the resource/property.
CloudFormation Template Consists Of
A CloudFormation template is made up of these main sections:
1. AWSTemplateFormatVersion → Template version (optional, e.g., `'2010-09-09'`).
2. Description → Explains what the template does.
3. Parameters → Inputs to customize the stack (e.g., instance type, environment).
4. Mappings → Lookup tables for static values (e.g., AMI IDs per region).
5. Conditions → Logic to create resources only in certain situations (e.g., Prod vs Dev).
6. Resources → The main section; defines AWS resources like EC2, S3, VPC, IAM roles.
7. Outputs → Values to export or display (e.g., VPC ID, S3 bucket name).
8. Transform (optional) → Macros or serverless transforms (like AWS SAM).
9. Metadata (optional) → Extra information for automation or documentation.
```
YAML Version
AWSTemplateFormatVersion: '2010-09-09'
Description: Simple template to create a VPC and EC2 instance
Parameters:
EnvType:
Type: String
AllowedValues: [Dev, Prod]
Mappings:
RegionMap:
us-east-1:
AMI: ami-0abcd1234efgh5678
us-west-2:
AMI: ami-0wxyz9876abcd5432
Conditions:
IsProd: !Equals [!Ref EnvType, Prod]
Resources:
MyVPC:
Type: AWS::EC2::VPC
Properties:
CidrBlock: 10.0.0.0/16
MyEC2:
Type: AWS::EC2::Instance
Condition: IsProd
Properties:
ImageId: !FindInMap [RegionMap, !Ref "AWS::Region", AMI]
InstanceType: t2.micro
Outputs:
VPCId:
Value: !Ref MyVPC
Description: The VPC ID
```
```
JSON Version
{
"AWSTemplateFormatVersion": "2010-09-09",
"Description": "Simple template to create a VPC and EC2 instance",
"Parameters": {
"EnvType": {
"Type": "String",
"AllowedValues": ["Dev", "Prod"]
}
},
"Mappings": {
"RegionMap": {
"us-east-1": { "AMI": "ami-0abcd1234efgh5678" },
"us-west-2": { "AMI": "ami-0wxyz9876abcd5432" }
}
},
"Conditions": {
"IsProd": { "Fn::Equals": [ { "Ref": "EnvType" }, "Prod" ] }
},
"Resources": {
"MyVPC": {
"Type": "AWS::EC2::VPC",
"Properties": { "CidrBlock": "10.0.0.0/16" }
},
"MyEC2": {
"Type": "AWS::EC2::Instance",
"Condition": "IsProd",
"Properties": {
"ImageId": { "Fn::FindInMap": [ "RegionMap", { "Ref": "AWS::Region" }, "AMI" ] },
"InstanceType": "t2.micro"
}
}
},
"Outputs": {
"VPCId": {
"Value": { "Ref": "MyVPC" },
"Description": "The VPC ID"
}
}
}
```
Both versions do exactly the same thing:
* Take EnvType as a parameter.
* Use RegionMap to select an AMI.
* Only create EC2 instance if `EnvType` is `Prod`.
* Create a VPC.
* Output the VPC ID.
Think of it like a building blueprint:
* Parameters → Choice of floor plan
* Mappings → Materials list per region
* Resources → Walls, doors, windows
* Conditions → Optional features
* Outputs → Building coordinates
Common Intrinsic Functions
| Function | Purpose | Example |
| ------------------------------------------- | --------------------------------------------- | -------------------------------------------------- |
| **Ref / !Ref** | Returns the value of a resource or parameter. | `!Ref MyBucket` → bucket name |
| **Fn::GetAtt / !GetAtt** | Returns a resource attribute. | `!GetAtt MyEC2.PublicIp` |
| **Fn::Join / !Join** | Joins multiple strings. | `!Join ["-", ["prod","web","01"]]` → `prod-web-01` |
| **Fn::Sub / !Sub** | Substitutes variables in a string. | `!Sub "my-bucket-${Env}"` |
| **Fn::If / !If** | Returns a value based on a condition. | `!If [IsProd, "ProdValue", "DevValue"]` |
| **Fn::ImportValue / !ImportValue** | Imports a value from another stack. | `!ImportValue MySharedVPC` |
| **Fn::FindInMap / !FindInMap** | Looks up a value in a Mapping. | `!FindInMap [RegionMap, !Ref AWS::Region, AMI]` |
| **Fn::Base64 / !Base64** | Converts text to Base64. | `!Base64 "echo Hello"` |
| **Fn::Not / Fn::And / Fn::Or / Fn::Equals** | Logical operations for conditions. | `!Equals [!Ref Env, "Prod"]` |
Simple Example
Template says:
* Make a VPC
* Inside it, launch an EC2 server
* Give it a security group
CloudFormation will:\
✅ Create the VPC\
✅ Then create the security group\
✅ Then launch the EC2 server inside that VPC with that security group
All automatically.
Physical Resources
These are the real AWS things that actually get created.
* Example: An EC2 instance, S3 bucket, or VPC that you can see in the AWS console.\
👉 Physical = the real objects in AWS.
Logical Resources
These are like names/placeholders in your CloudFormation template.
* Example: In your template, you might write:
```yaml
MyServer:
Type: AWS::EC2::Instance
Properties:
InstanceType: t2.micro
```
* `MyServer` = Logical resource name (only exists inside the template).
* The actual EC2 instance AWS creates = Physical resource.
👉 Logical = the blueprint name in the template,\
👉 Physical = the actual AWS thing created from it.
Stacks
* A stack = A collection of AWS resources that CloudFormation creates and manages as one unit.
* If your template defines a VPC, EC2, and S3 bucket → CloudFormation makes them all together in one stack.
* You can update, delete, or duplicate an entire environment by managing the stack.
👉 Stack = the whole project built from one CloudFormation template.
Real-world analogy: Building a house
* Logical resources = blueprint labels ("Bedroom1", "Kitchen", "Garage").
* Physical resources = the actual rooms built in the house.
* Stack = the whole house built from that single blueprint.
Template
Stack
### Non-Portable Aspects of CloudFormation
Non-portable means parts of a template or configuration that can’t easily be reused across accounts, regions, or clouds without modification.
Here’s the breakdown:
Region-Specific Resources
* Some AWS services only exist in certain regions (e.g., AWS Local Zones, Outposts).
* If your template includes these, it won’t deploy in another region without changes.
Example:\
An `AWS::EC2::Instance` type with an `AvailabilityZone` set to `us-east-1a` won’t work in `eu-west-1`.
Hard-Coded Resource Identifiers
* If you hardcode values like:
* AMI IDs (e.g., `ami-1234abcd`) → AMIs are region-specific.
* Subnet IDs, VPC IDs, SG IDs → These differ by account and region.
Solution: Use Mappings, Parameters, or SSM Parameters instead of hardcoding.
Service-Specific Limitations
* Some resources require account-level configuration before deployment.
* Example: AWS Organizations, Service Control Policies (SCPs), IAM identity center roles → These may fail if the org/account structure differs.
Non-AWS-Native Constructs
* Templates using custom resources (backed by Lambda functions) might be tied to one account/region.
* If the Lambda code isn’t portable, the template breaks elsewhere.
Dependencies on External Data
* Referencing non-global ARNs or account IDs ties templates to one account.
* Example: An S3 bucket policy referencing a fixed account ARN.
Global vs Regional Services
* Some services are global (like IAM), while others are regional (like EC2).
* Templates mixing them can behave differently across accounts.
Rule of Thumb:\
CloudFormation templates are portable only if they avoid hardcoded, region/account-specific values and stick to parameters, mappings, and lookups.
Quick Analogy:
* Portable template = Universal phone charger → works anywhere.
* Non-portable template = Region-locked power adapter → only works in one country.
Link
```
https://docs.aws.amazon.com/AWSCloudFormation/latest/TemplateReference/aws-template-resource-type-ref.html
```
YAML CF
```
Resources:
Bucket:
Type: 'AWS::S3::Bucket'
Properties:
BucketName: 'accatpics13333337'
Instance:
Type: 'AWS::EC2::Instance'
Properties:
InstanceType: "t2.micro"
ImageId: 'ami-090fa75af13c156b4'
```
Json CF
```
{
"Resources": {
"Bucket": {
"Type": "AWS::S3::Bucket",
"Properties": {
"BucketName": "accatpics13333337"
}
},
"Instance": {
"Type": "AWS::EC2::Instance",
"Properties": {
"InstanceType": "t2.micro",
"ImageId": "ami-090fa75af13c156b4"
}
}
}
}
```
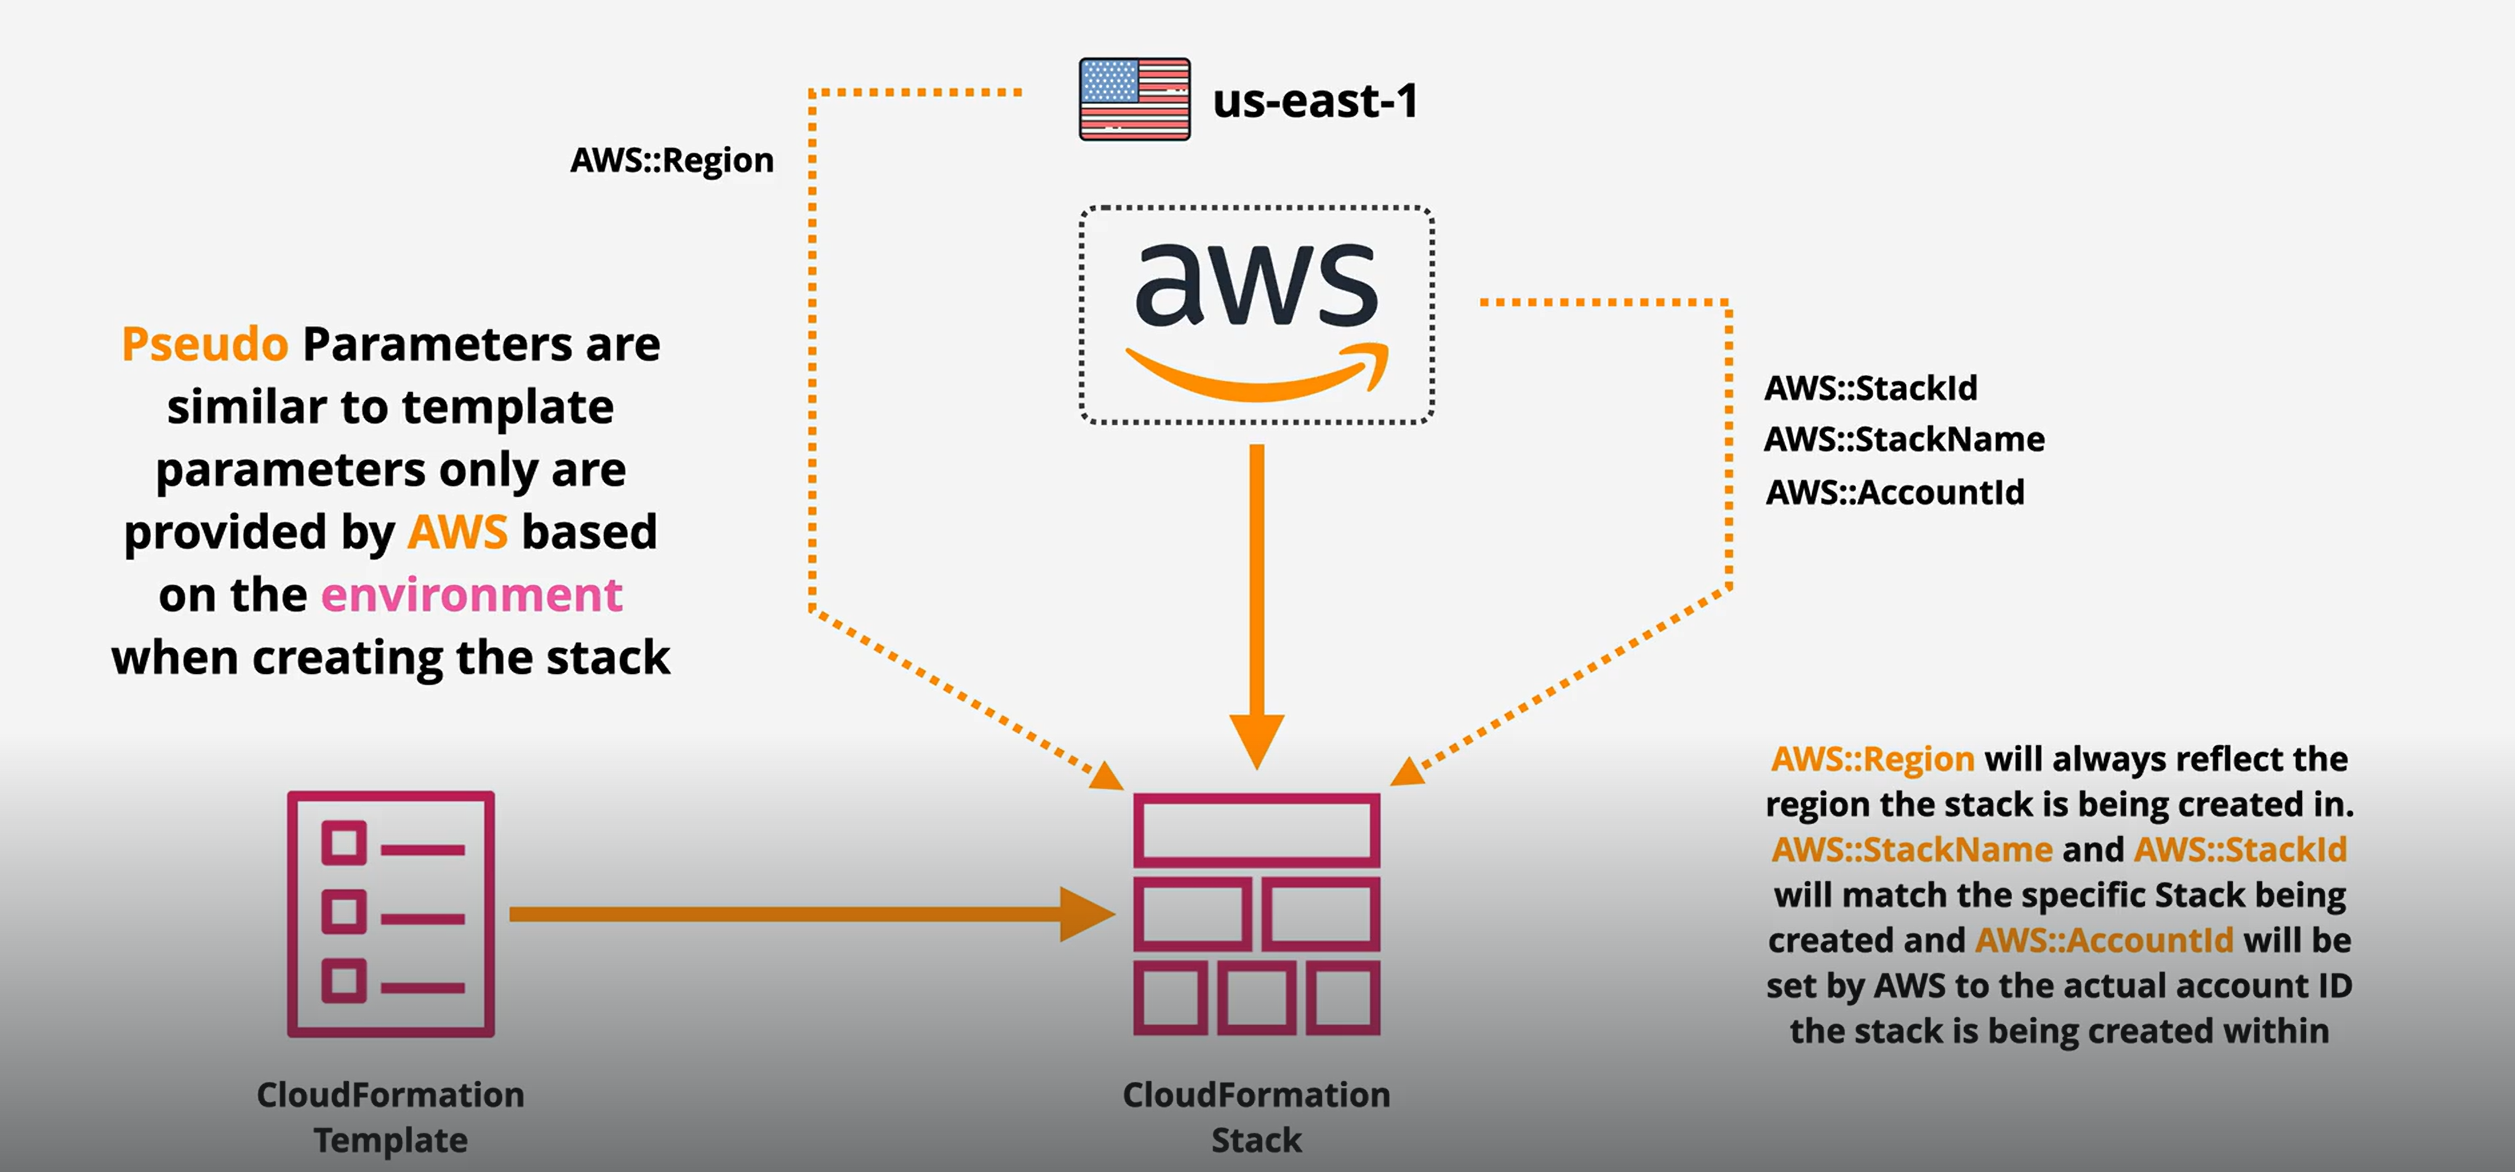
### CloudFormation – Parameters, Mappings & Pseudo Parameters
What it is
* Parameters → Inputs you pass into a CloudFormation stack (like instance type, environment name).
* Mappings → Lookup tables inside the template that return values based on keys (like region → AMI ID).
* Pseudo Parameters → Predefined AWS variables available automatically (like AccountId, Region, StackName).
Why it matters
* Makes templates reusable (one template for dev, test, prod).
* Avoids hardcoding values (region-specific AMIs, account IDs).
* Helps with automation (AWS fills in account/region automatically).
* Supports consistency and portability across regions and accounts.
How it works
1. Parameters → User provides a value when launching the stack.
* Example: choose `t2.micro` vs `t3.small`.
2. Mappings → Template designer creates a lookup table.
* Example: In `us-east-1` use `ami-1234`, in `eu-west-1` use `ami-5678`.
3. Pseudo Parameters → AWS automatically injects built-in values.
* Example: `AWS::Region` will resolve to `us-east-1`.
Types / Components
1\. Parameters
* Dynamic, provided at stack creation.
* Example: EC2 instance type, environment name.
2\. Mappings
* Static key-value lookup table inside the template.
* Example: Region → AMI IDs.
3\. Pseudo Parameters
* Built-in constants AWS gives you for free.
* Examples:
* `AWS::Region` → Current region.
* `AWS::AccountId` → Account ID.
* `AWS::StackName` → Stack name.
Examples / Scenarios
Scenario 1: Deploy EC2 with region-specific AMI
* Use Mappings for AMIs (different per region).
* Use Pseudo Parameter `AWS::Region` to pick correct one.
Scenario 2: Multi-environment setup
* Use Parameters for environment type (`Dev`, `Prod`).
* Template provisions bigger EC2 in `Prod` and smaller EC2 in `Dev`.
Scenario 3: S3 bucket naming convention
* Use Pseudo Parameters → bucket name = `mybucket-${AWS::AccountId}-${AWS::Region}`.
Template Parameters
Pseudo Parameters
Mapping
Simple Analogy\
Think of ordering food 🍔:
* Parameters = Your choices (burger size, drink type).
* Mappings = Restaurant’s menu lookup (NY branch vs London branch price list).
* Pseudo Parameters = Auto-filled order info (order number, branch location).
### CloudFormation – Intrinsic Functions
#### What it is?
Intrinsic functions are built-in functions in CloudFormation that let you do dynamic things inside a template.\
Instead of hardcoding values, you can reference, join, substitute, or calculate values at runtime.
#### Why it matters
* Makes templates flexible and reusable.
* Automates resource configuration (no need to manually type IDs).
* Supports dynamic logic (like picking AMI IDs, generating names, combining values).
* Reduces errors by avoiding copy-paste of static values.
How it works
1. You use an intrinsic function in your template (in YAML/JSON).
2. CloudFormation evaluates it when creating or updating the stack.
3. The function returns the correct value (resource ID, concatenated string, conditional result, etc.).
Types / Components (Main Intrinsic Functions)
1. Fn::Ref → Returns the value of a parameter or resource.
* Example: `Ref: MyInstanceType`.
2. Fn::GetAtt → Gets an attribute of a resource.
* Example: `Fn::GetAtt: [MyEC2, PublicDnsName]`.
3. Fn::Join → Joins values with a delimiter.
* Example: `Fn::Join: ["-", ["web", "app", "01"]] → web-app-01`.
4. Fn::Sub → String substitution with variables.
* Example: `Fn::Sub: "arn:aws:s3:::${BucketName}"`.
5. Fn::FindInMap → Looks up values in a mapping.
* Example: Pick AMI based on region.
6. Fn::If / Fn::Equals / Fn::Not / Fn::And / Fn::Or → Conditional logic.
7. Fn::ImportValue → Imports values from another stack.
8. Fn::Base64 → Encodes text in Base64 (useful for EC2 user data).
Ref and Fn::GetAtt
Fn::GetAZs and Fn::Select
Fn::join and Fn::Split
Fn::Base64 and Fn::Sub
Fn::Cidr
Some more Scenarios
Scenario 1: EC2 Instance with dynamic type
```yaml
InstanceType: !Ref MyInstanceType
```
(Ref returns user-provided parameter).
Scenario 2: S3 bucket with account ID
```yaml
BucketName: !Sub "mybucket-${AWS::AccountId}"
```
(Sub substitutes account ID dynamically).
Scenario 3: Region-based AMI lookup
```yaml
ImageId: !FindInMap [RegionMap, !Ref "AWS::Region", AMI]
```
(FindInMap selects AMI ID based on region).
Scenario 4: Conditional resources
```yaml
!If [IsProd, "t3.large", "t3.micro"]
```
(Choose instance type depending on environment).
Simple Analogy\
Think of Intrinsic Functions like “shortcuts” in Excel formulas 📊:
* `Ref` = Cell reference (use the value in another cell).
* `Sub` = String with variables (`"Hello ${Name}"`).
* `Join` = Concatenate text with separators.
* `FindInMap` = Lookup table (like VLOOKUP).
* `If` = Conditional formula (`IF(A1="Prod", "Large", "Small")`).
### CloudFormation – Outputs
#### What it is
* Outputs are values you declare in a CloudFormation template that get displayed after the stack is created.
* Think of them as the final results or important information you want CloudFormation to show once resources are deployed.
Why it matters
* Helps you quickly find resource details (like VPC ID, S3 bucket name, Load Balancer DNS).
* Makes sharing values between stacks possible (via `Export` / `ImportValue`).
* Useful for automation → other templates, pipelines, or teams can use exported outputs.
* Saves time → no need to dig into the AWS console to copy resource IDs.
How it works
1. In your template, you define an Outputs section.
2. Each output has:
* Name (key you choose).
* Value (what to display or export).
* Export (optional) → lets other stacks reuse it.
3. After stack creation/update → you can see outputs in the AWS console, CLI, or use them in other stacks.
Types / Components
1. Basic Output
* Just shows a value.
* Example: VPC ID, Instance ID.
2. Exported Output
* Makes the value available to other stacks (cross-stack reference).
* Example: Exporting a VPC ID so another stack can create subnets in it.
Output
#### Scenarios
Scenario 1: Show Load Balancer DNS
```yaml
Outputs:
LoadBalancerDNS:
Description: "DNS of the Application Load Balancer"
Value: !GetAtt MyALB.DNSName
```
Scenario 2: Export a VPC ID for another stack
```yaml
Outputs:
MyVPCID:
Description: "VPC ID for cross-stack use"
Value: !Ref MyVPC
Export:
Name: MyApp-VPCID
```
Scenario 3: Reuse exported value in another template
```yaml
Resources:
MySubnet:
Type: AWS::EC2::Subnet
Properties:
VpcId: !ImportValue MyApp-VPCID
```
Simple Analogy\
Think of building a house 🏡:
* Outputs = The keys, address, and WiFi password you hand over after construction.
* They’re not part of the construction itself, but they’re essential for using the house and connecting it with other utilities.
### CF for portable and non-portable version
These have been divided into three stages. As you can see from the code, even minor changes can transform a non-portable template into a portable one. The two templates below — one in YAML and the other in JSON — can be used interchangeably, so you can work with whichever format you prefer.
{% file src="" %}
{% file src="" %}
{% file src="" %}
{% file src="" %}
{% file src="" %}
{% file src="" %}
{% file src="" %}
{% file src="" %}
### CloudFormation – Conditions
#### What it is
#### Conditions in CloudFormation let you **control whether certain resources, properties, or outputs are created or not**, depending on parameters or environment values.
* Example: Only create an **S3 bucket** if the environment is **Prod**, not Dev/Test.
Why it matters
* Helps reuse the same template across different environments (Dev, Test, Prod).
* Makes templates flexible → avoids duplicate templates for small differences.
* Saves costs by conditionally creating resources only when needed.
* Simplifies multi-environment deployments.
How it works
1. Define a Condition → Based on Parameters, Mappings, or Pseudo Parameters.
2. Assign the Condition → Attach it to a resource, property, or output.
3. CloudFormation evaluates the condition when creating/updating the stack.
4. If true → resource/property/output is created.
5. If false → CloudFormation skips it.
Components / Syntax
* `Conditions` block → Defines all conditions in the template.
* Intrinsic functions used inside Conditions:
* `Fn::If` → If-Else logic.
* `Fn::Equals` → Compare values.
* `Fn::And` / `Fn::Or` → Combine multiple conditions.
* `Fn::Not` → Negate a condition.
Example
Template Snippet
```yaml
Parameters:
EnvType:
Type: String
AllowedValues:
- Dev
- Prod
Conditions:
IsProd: !Equals [!Ref EnvType, Prod]
Resources:
MyS3Bucket:
Type: AWS::S3::Bucket
Condition: IsProd
Properties:
BucketName: !Sub "myapp-${EnvType}-bucket"
Outputs:
BucketOutput:
Condition: IsProd
Value: !Ref MyS3Bucket
```
✅ If EnvType = Prod → S3 bucket + output created.\
❌ If EnvType = Dev → No bucket, no output.
Analogy
Think of Conditions as a traffic signal 🚦 inside your template:
* Green (True) → Allow the resource to be created.
* Red (False) → Stop, don’t create it.
### CloudFormation – `DependsOn`
What it is
* `DependsOn` is a special property in CloudFormation that controls the creation order of resources.
* It tells CloudFormation: *“Don’t create this resource until another resource is fully created.”*
Why it matters
* CloudFormation usually figures out dependencies automatically (like an EC2 instance needs a Security Group).
* But sometimes you must manually enforce the order (e.g., make sure a database is created before an application server connects to it).
* Prevents deployment errors where resources depend on others not yet ready.
How it works
1. Add a `DependsOn` attribute to a resource.
2. CloudFormation waits for the specified resource(s) to finish.
3. Then it starts creating the dependent resource.
Syntax / Components
```yaml
Resources:
MyDB:
Type: AWS::RDS::DBInstance
Properties:
DBInstanceClass: db.t3.micro
Engine: mysql
MyAppServer:
Type: AWS::EC2::Instance
DependsOn: MyDB
Properties:
InstanceType: t2.micro
ImageId: ami-0abcd1234567890
```
👉 Here:
* `MyAppServer` won’t be created until `MyDB` is fully set up.
✅ You can also list multiple resources:
```yaml
DependsOn:
- ResourceA
- ResourceB
```
Example Scenarios
* Web Server → Database: Ensure DB exists before the app server launches.
* IAM Role → EC2 Instance: Create IAM role before attaching to instance.
* Lambda → Log Group: Create log group first, then Lambda.
Analogy
Imagine building a house 🏠:
* You can’t install windows until the walls are built.
* `DependsOn` = “Windows depend on Walls.”
Pro Tip: Use `DependsOn` only when CloudFormation cannot detect dependency automatically — too much manual ordering can slow deployments.
### CloudFormation – WaitCondition & `cfn-signal`
What it is
* WaitCondition → A special CloudFormation resource that makes the stack creation/update pause until a signal is received.
* `cfn-signal` → A helper script that sends a success/failure signal from an EC2 instance (or resource) back to CloudFormation.
👉 Together, they are used to wait until custom actions (like software install/config) are completed before moving on.
Why it matters
* Some resources (e.g., EC2, RDS) may need extra setup after creation (installing software, running scripts).
* Without signaling, CloudFormation may think the resource is ready before it actually is.
* WaitCondition + cfn-signal ensures:
* Infra is only marked complete when it’s truly ready.
* Prevents stacks from getting stuck in a bad state.
* Useful for bootstrapping (installing apps, configuring servers).
How it works (Step by Step)
1. Define a WaitConditionHandle → A pre-signed URL that receives the signal.
2. Create a WaitCondition → Specifies how many success signals are expected, and timeout.
3. Launch EC2 (or resource) → Use `UserData` script that runs setup commands.
4. Run `cfn-signal` → Send success/failure to the WaitConditionHandle.
5. CloudFormation continues → Only if the signal(s) are received before timeout.
Components
* WaitConditionHandle
* Generates a unique URL for signaling.
* Acts like a “phone line” CloudFormation listens to.
* WaitCondition
* Defines how many signals must be received (`Count`).
* Has a `Timeout` in seconds.
* cfn-signal (helper script)
* Installed by default on Amazon Linux AMIs.
* Command:
```bash
/opt/aws/bin/cfn-signal -e $? \
--stack \
--resource \
--region
```
Example
```yaml
Resources:
MyWaitHandle:
Type: AWS::CloudFormation::WaitConditionHandle
MyWaitCondition:
Type: AWS::CloudFormation::WaitCondition
Properties:
Handle: !Ref MyWaitHandle
Timeout: 300
Count: 1
MyEC2Instance:
Type: AWS::EC2::Instance
Properties:
InstanceType: t2.micro
ImageId: ami-0abcd1234567890
UserData:
Fn::Base64: !Sub |
#!/bin/bash
yum install -y httpd
systemctl start httpd
/opt/aws/bin/cfn-signal -e $? \
--stack ${AWS::StackName} \
--resource MyWaitCondition \
--region ${AWS::Region}
```
👉 Flow:
* EC2 installs Apache → sends success signal → WaitCondition is satisfied → stack continues.
CF Provisioning
Creation policy
Wait Condition
Analogy
Think of WaitCondition like a teacher waiting for students to hand in assignments:
* Teacher = CloudFormation
* Assignment = Setup task (e.g., install Apache)
* Student raises hand = `cfn-signal`
* Only when all hands are raised (signals received) → teacher moves on.
Pro Tips:
* If timeout expires → stack creation fails.
* Use when resources need custom setup time.
* For autoscaling, use CreationPolicy + cfn-signal instead of WaitCondition.
### CloudFormation – Nested Stacks
What it is
* A Nested Stack is a CloudFormation stack inside another stack.
* It lets you reuse templates by calling them as resources in a parent template.
* Think of it like modular templates → one big stack is broken into smaller, reusable stacks.
Why it matters
* Reusability → Write once, reuse the same template in many projects.
* Manageability → Break down a huge template into smaller, easier-to-read files.
* Consistency → Common infra components (like VPCs, IAM roles) can be standardized.
* Collaboration → Teams can work on different nested stacks independently.
How it works (Step by Step)
1. Parent Stack → Main template that references other templates.
2. Nested Stacks → Templates defined as resources inside the parent stack.
3. CloudFormation deploys the parent, which automatically creates the child stacks.
4. Changes in child templates → Propagate when the parent is updated.
Components / Syntax
Parent Template Example
```yaml
Resources:
NetworkStack:
Type: AWS::CloudFormation::Stack
Properties:
TemplateURL: https://s3.amazonaws.com/mybucket/network.yaml
AppStack:
Type: AWS::CloudFormation::Stack
Properties:
TemplateURL: https://s3.amazonaws.com/mybucket/app.yaml
Parameters:
VPC: !GetAtt NetworkStack.Outputs.VPCId
```
👉 Here:
* `NetworkStack` creates a VPC.
* `AppStack` depends on `NetworkStack` → uses its output (`VPCId`).
A Isolated Stack
Nested Stack
Example Scenarios
* Standard VPC Module → One template defines VPC, subnets, NAT. Reused across all apps.
* Application Layers → Parent stack creates `Network`, `Security`, `App` nested stacks.
* Multi-Team Projects → One team owns the DB template, another owns compute, all combined in parent.
Analogy
Think of Nested Stacks like folders and subfolders in your computer:
* Parent stack = Main folder.
* Nested stacks = Subfolders containing organized files.
* You can reuse subfolders in different projects without duplicating files.
Pro Tips:
* Keep templates modular (VPC, Security, App, Monitoring).
* Nested stacks must be stored in S3 or a URL.
* Updating parent automatically updates nested stacks.
* Maximum depth = 5 levels of nesting.
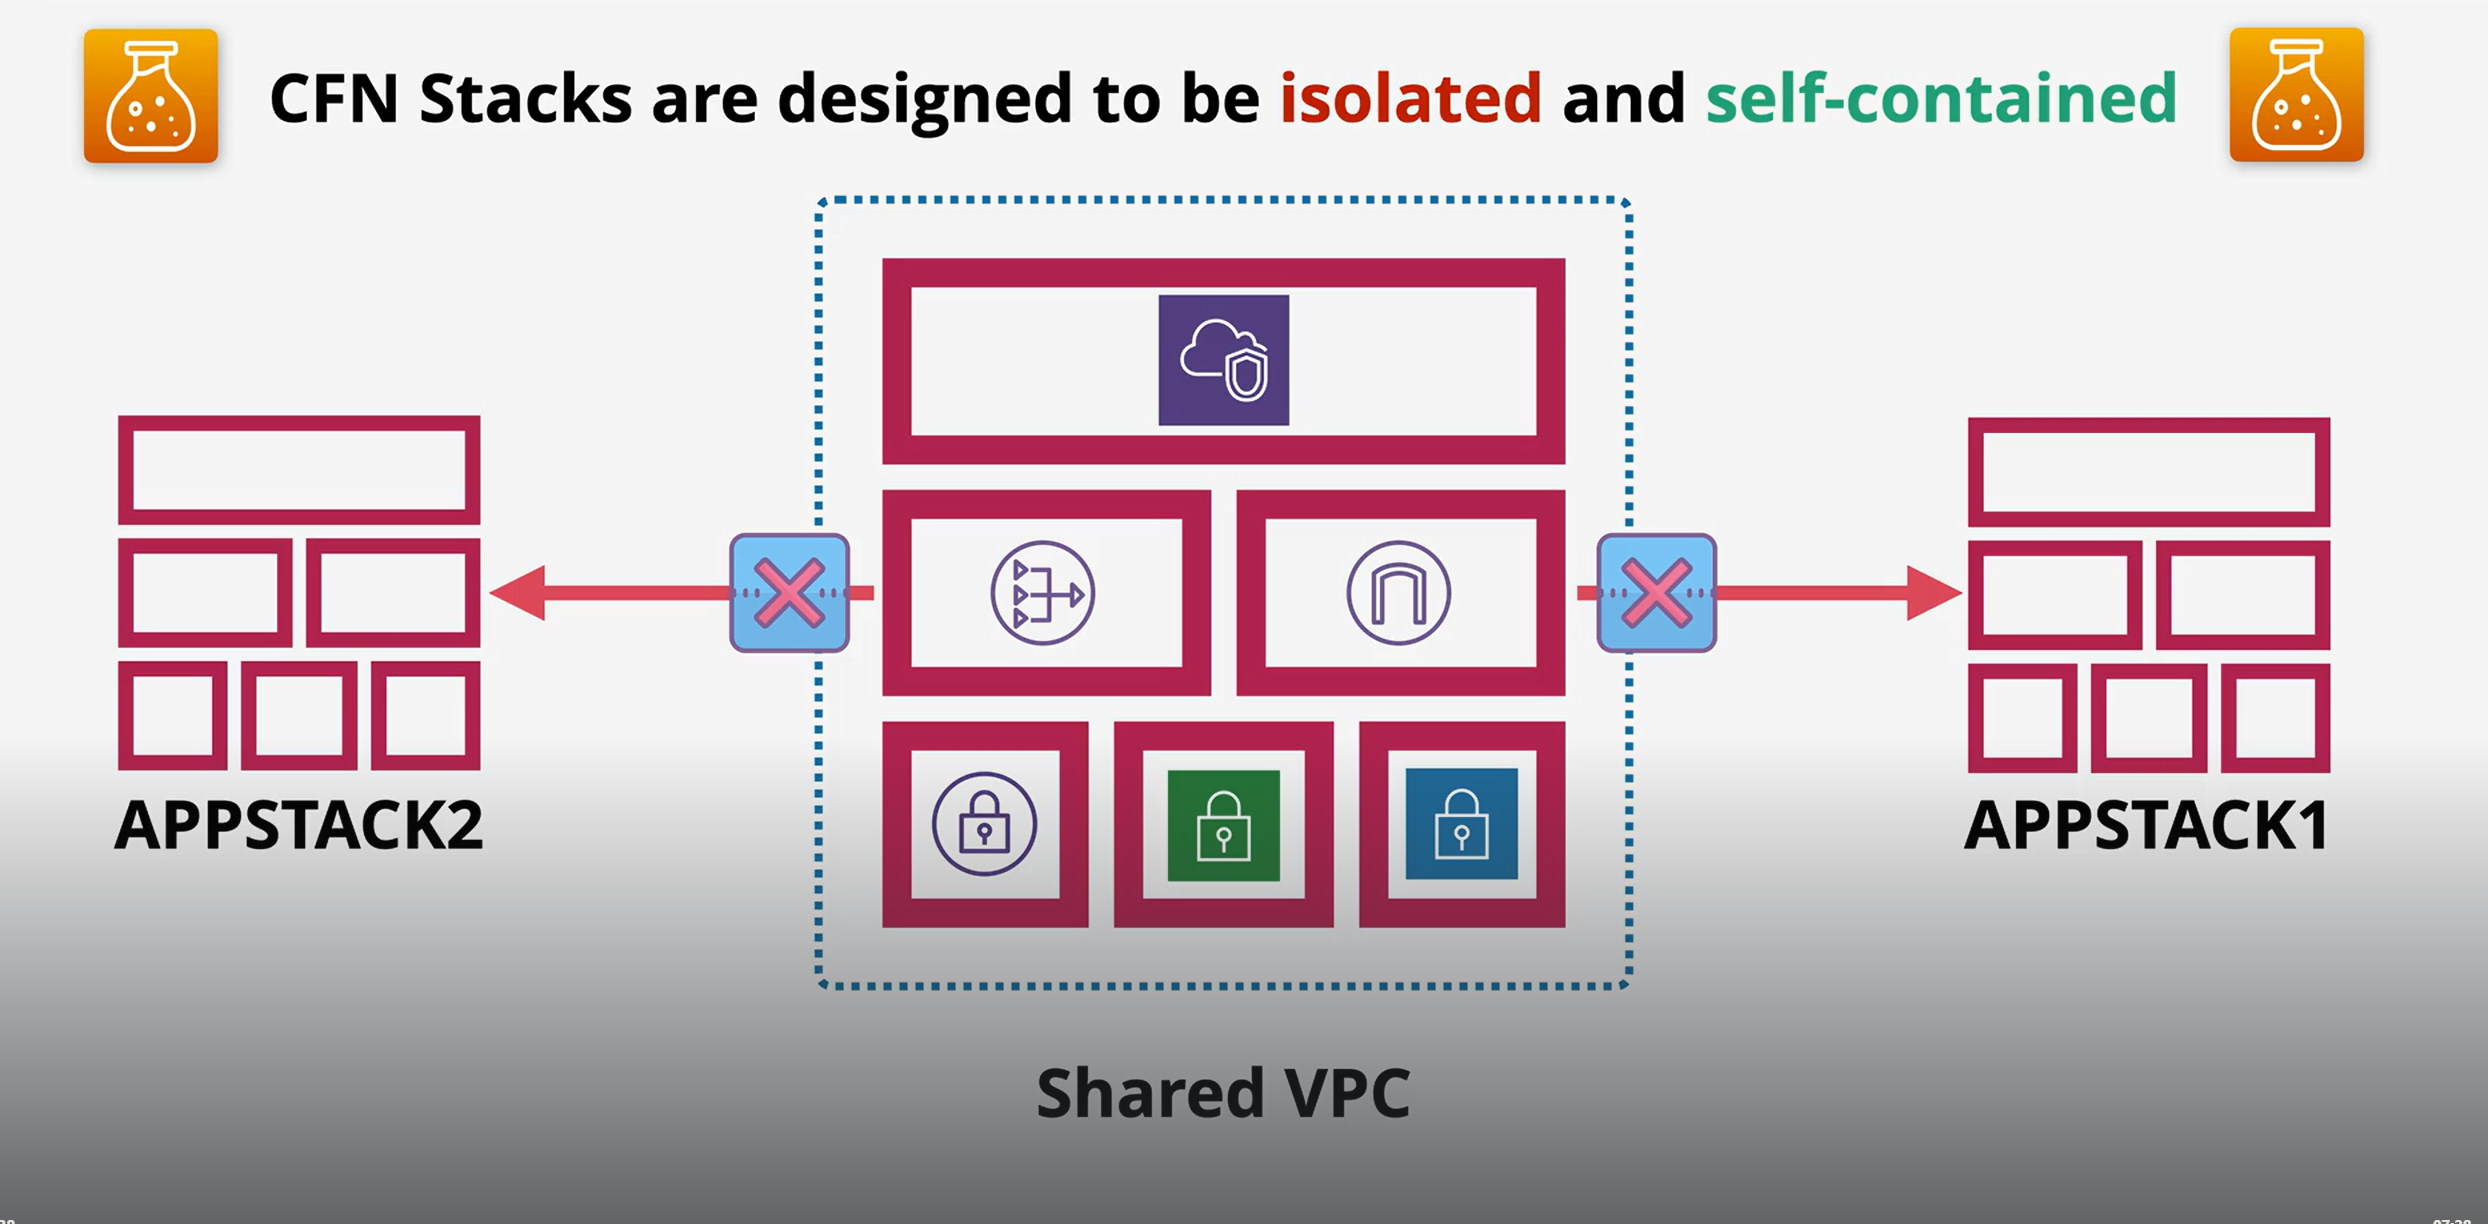
### CloudFormation – Cross-Stack References
What it is
* Cross-stack references let you share resources between different stacks.
* One stack exports values (like a VPC ID, subnet, or security group).
* Another stack imports those values and uses them.
👉 It’s CloudFormation’s way of making stacks talk to each other.
Why it matters
* Modularity → Split infrastructure into multiple smaller stacks instead of one big template.
* Reusability → Common resources (VPC, IAM roles, etc.) can be shared across multiple stacks.
* Consistency → Ensures everyone uses the same shared resource (no duplicates).
* Team collaboration → Different teams manage their stacks independently but still connect them.
How it works (Step by Step)
1. Stack A (Producer) → Defines a resource and exports its value.
2. Stack B (Consumer) → Uses `Fn::ImportValue` to import that exported value.
3. CloudFormation ensures dependencies are respected between stacks.
Components / Syntax
Stack A (Producer – VPC stack)
```yaml
Resources:
MyVPC:
Type: AWS::EC2::VPC
Properties:
CidrBlock: 10.0.0.0/16
Outputs:
VPCIdExport:
Value: !Ref MyVPC
Export:
Name: MySharedVPC
```
Stack B (Consumer – App stack)
```yaml
Resources:
MySubnet:
Type: AWS::EC2::Subnet
Properties:
VpcId: !ImportValue MySharedVPC
CidrBlock: 10.0.1.0/24
```
👉 Here:
* Stack A creates a VPC and exports its ID.
* Stack B imports that VPC ID to create a subnet inside it.
Isolated Stacks
Cross stack
Example Scenarios
* Shared Networking → One stack manages VPC, subnets; other stacks (apps, DBs) reuse it.
* Central IAM Roles → Export IAM roles once, import into multiple app stacks.
* Multi-team setup → Networking team manages network stack, dev team imports network IDs into app stack.
Analogy
Think of Cross-Stack References like a shared library 📚:
* One stack publishes a book (exports value).
* Other stacks borrow that book (import value).
* Everyone uses the same edition → no duplicates or mismatched versions.
Pro Tips:
* Export names must be unique within an AWS account & region.
* If you delete an export, all importing stacks will break.
* Use Cross-Stack when stacks are tightly coupled.
* For multi-account or multi-region → use StackSets instead.
### **Quick comparison table** between **Cross-Stack** and **Nested Stack**
| Feature | **Nested Stack** | **Cross-Stack** |
| ----------------- | --------------------------------------------------------------- | -------------------------------------------------------------------------------- |
| **Definition** | A stack inside another stack (parent/child relationship). | Separate stacks that share resources using `Export` and `ImportValue`. |
| **Coupling** | **Tightly coupled** – child stack depends fully on parent. | **Loosely coupled** – independent stacks connected only through exports/imports. |
| **Management** | Managed as **one unit** – updating parent updates children too. | Managed **independently** – stacks can be updated separately. |
| **Use Case** | Reuse **common templates** (e.g., standard VPC, IAM policies). | Share **resources** across stacks (e.g., VPC ID, subnet, security group). |
| **Update Impact** | Updating parent may cascade updates to nested stacks. | Updating an export may break importing stacks if not handled carefully. |
| **Reusability** | Template reuse (modular design within a single solution). | Resource reuse (share existing infrastructure between solutions). |
| **Analogy** | Like a **folder with subfolders** → one structure. | Like **libraries shared between projects** → separate but connected. |
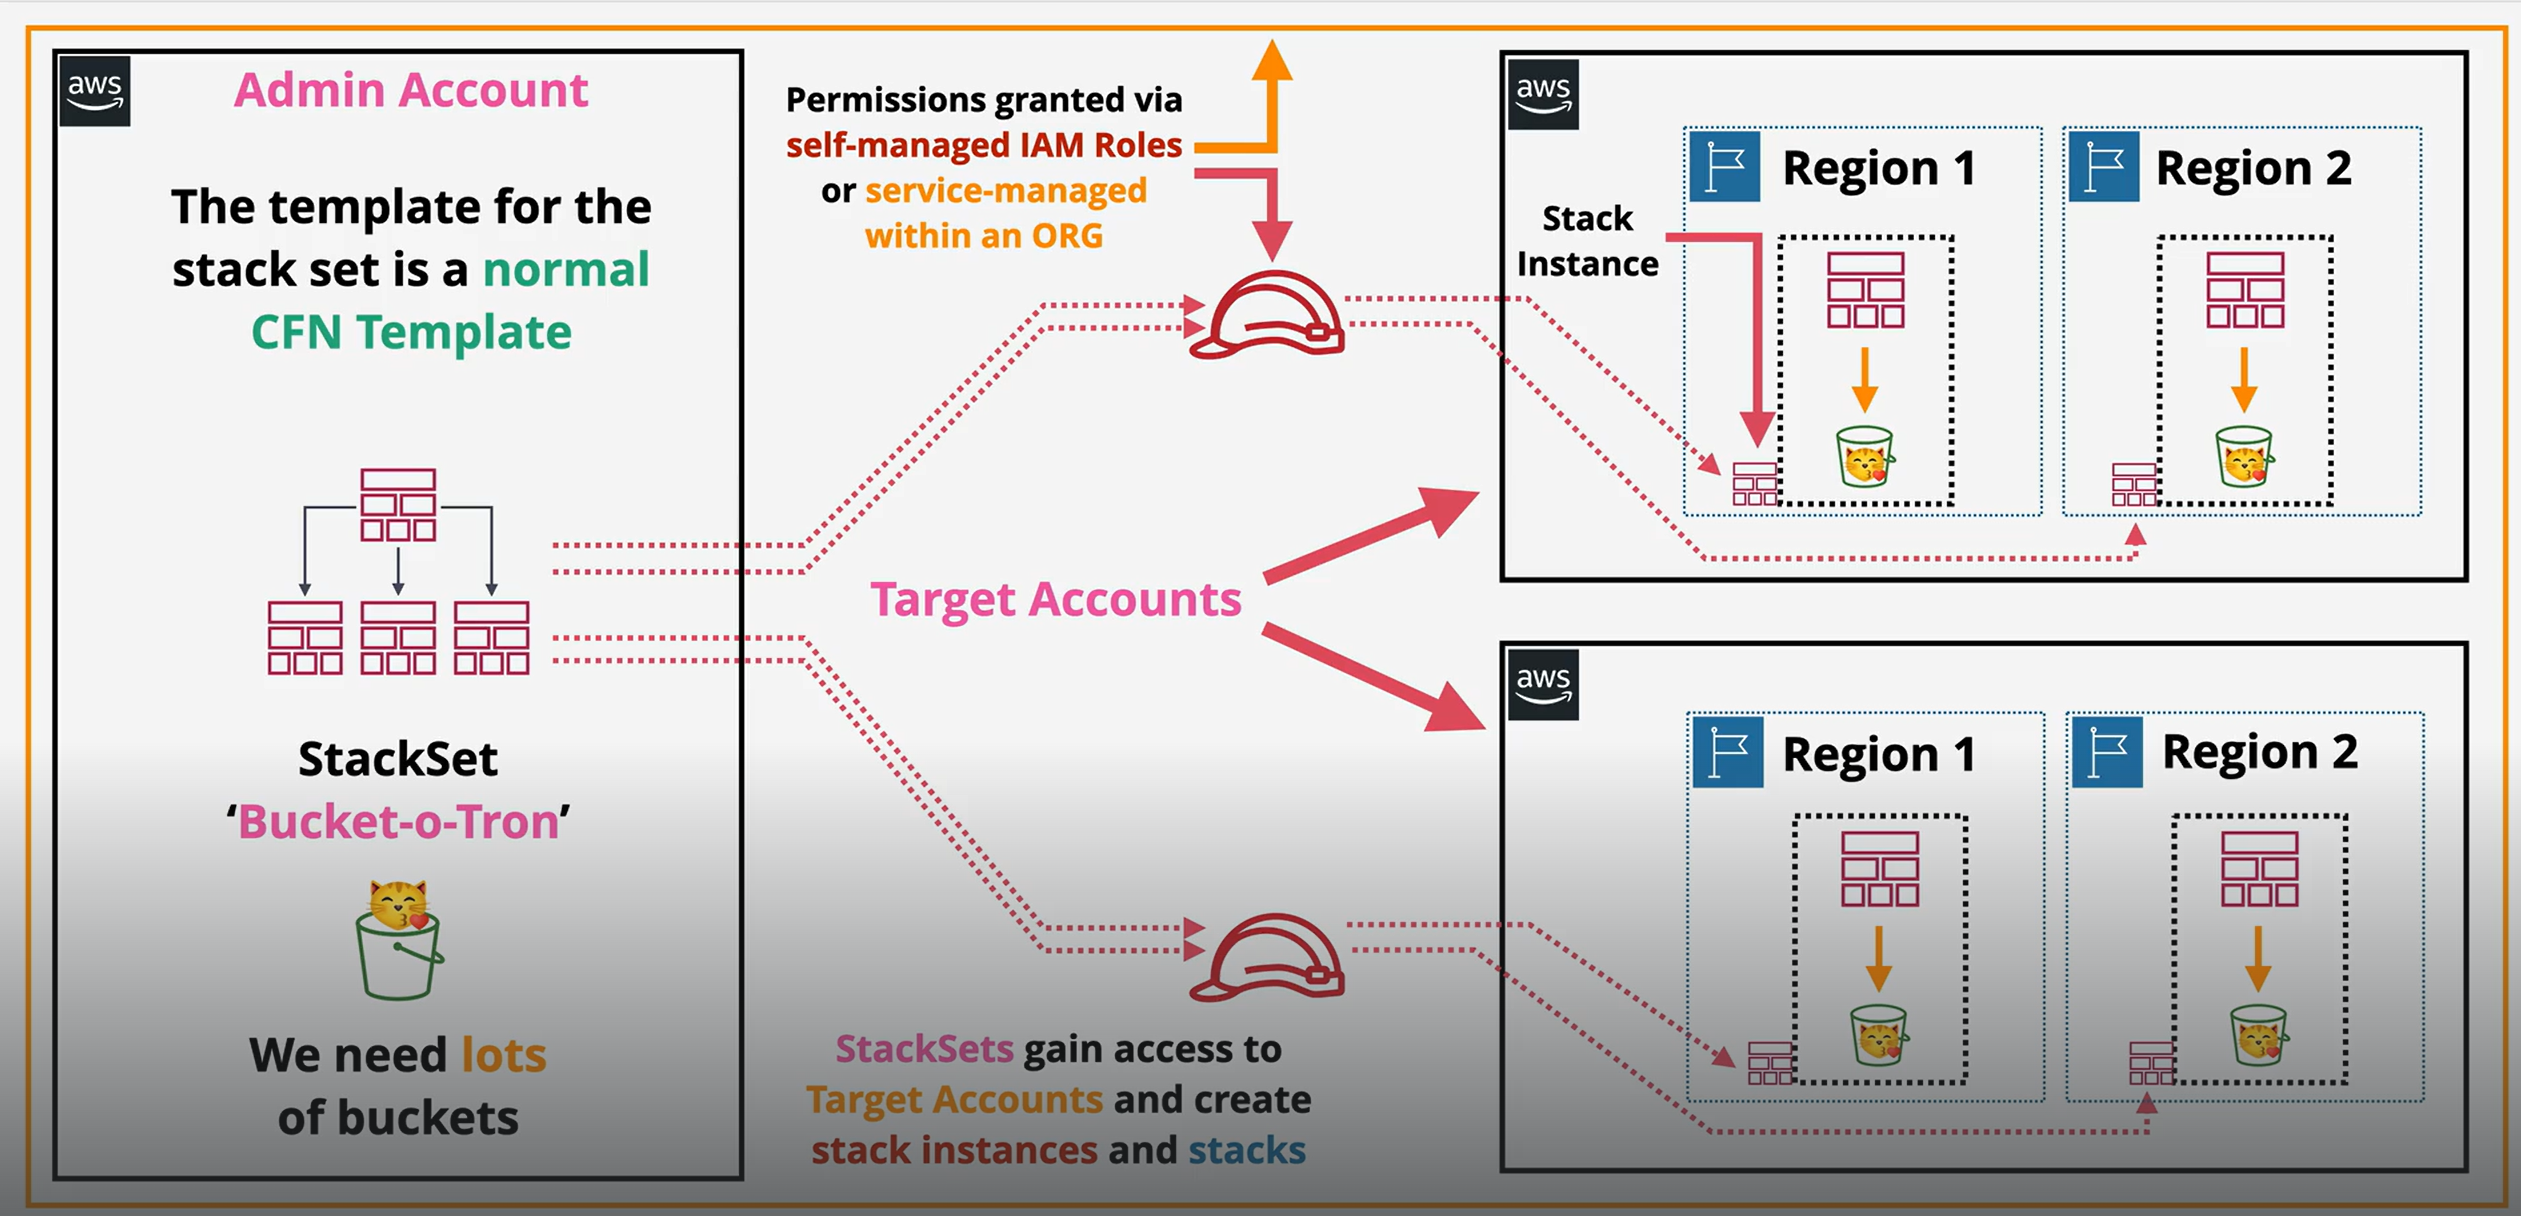
### CloudFormation – StackSets
What it is
* StackSets allow you to create, update, or delete stacks across multiple AWS accounts and regions from a single CloudFormation template.
* Essentially, one template can manage many stacks in different accounts/regions simultaneously.
Why it matters
* Simplifies multi-account, multi-region deployments.
* Ensures consistency across environments.
* Saves time → no need to deploy the same stack manually in each account/region.
* Ideal for centralized management in large organizations using AWS Organizations.
How it works (Step by Step)
1. Create a StackSet → Upload the CloudFormation template.
2. Define Targets → Choose AWS accounts and regions where stacks will be deployed.
3. Specify Parameters → Pass parameters for each deployment if needed.
4. Deploy Stack Instances → CloudFormation creates a stack in each target account/region.
5. Update/Delete → Changes to the StackSet propagate to all stack instances automatically.
Components / Syntax
| Component | Description |
| ----------------------- | ---------------------------------------------------------------- |
| **StackSet** | The template + configuration for multiple accounts/regions. |
| **Stack Instance** | A stack deployed in a specific account/region from the StackSet. |
| **Accounts & Regions** | The targets where Stack Instances are deployed. |
| **Administration Role** | IAM role in the admin account to manage StackSets. |
| **Execution Role** | IAM role in target accounts to allow deployment. |
Usecase
Example Scenarios
* Deploy a standard VPC across all AWS accounts in an organization.
* Roll out IAM policies consistently to multiple accounts.
* Deploy CloudWatch monitoring/alarming setup across regions/accounts.
* Enforce security baselines (Config rules, GuardDuty setup) across organization.
Analogy
Think of StackSets like a central factory sending standardized kits to multiple stores 🏬:
* Factory = StackSet (single template).
* Stores = AWS accounts/regions.
* Each store receives the same kit (stack instance) automatically.
Key Differences vs Nested & Cross-Stack
| Feature | StackSets | Nested Stack | Cross-Stack |
| -------------- | ----------------------------------- | ------------------------------------- | ----------------------------------------- |
| **Scope** | Multi-account, multi-region | Single account, single region | Single account, single region |
| **Coupling** | Loosely coupled – managed centrally | Tightly coupled – parent/child | Loosely coupled – stacks share resources |
| **Use Case** | Org-wide deployments | Modular templates within one solution | Share resources across stacks |
| **Management** | Centralized updates across accounts | Updates cascade from parent | Updates independent, careful with exports |
Pro Tip:
* Use StackSets only if your organization has multiple AWS accounts and you need centralized management.
* For a single account/region → Nested or Cross-Stack is sufficient.
### CloudFormation – DeletionPolicy
What it is
* DeletionPolicy is an attribute you attach to a resource in a CloudFormation template.
* It controls what happens to a resource when the stack is deleted.
* By default, resources are deleted with the stack unless you specify otherwise.
Why it matters
* Prevents accidental deletion of critical resources (like databases, S3 buckets).
* Ensures important data or infrastructure can persist beyond stack deletion.
* Gives more control over cleanup during stack updates or removal.
How it works
1. Attach `DeletionPolicy` to a resource in the template.
2. Set one of the supported policies (`Delete`, `Retain`, `Snapshot`).
3. CloudFormation enforces that behavior when the stack is deleted.
Types / Options
| Policy | Description | Use Case |
| ------------ | ------------------------------------------------------ | ---------------------------------------------------------------------- |
| **Delete** | Resource is deleted along with the stack. | Default behavior, for temporary or replaceable resources. |
| **Retain** | Resource is **kept**, even if stack is deleted. | Critical S3 buckets, DynamoDB tables, or VPCs you want to preserve. |
| **Snapshot** | CloudFormation creates a **snapshot** before deleting. | RDS, Redshift, or EBS volumes where you want a backup before deletion. |
Examples
1\. Retain an S3 bucket
```yaml
Resources:
MyBucket:
Type: AWS::S3::Bucket
DeletionPolicy: Retain
```
* Stack deletion → bucket stays.
2\. Snapshot an RDS database
```yaml
Resources:
MyDatabase:
Type: AWS::RDS::DBInstance
DeletionPolicy: Snapshot
```
* Stack deletion → RDS is deleted but a snapshot is created first.
3\. Default Delete behavior
```yaml
Resources:
MyEC2:
Type: AWS::EC2::Instance
DeletionPolicy: Delete
```
* Stack deletion → EC2 instance is terminated.
Analogy
Think of DeletionPolicy like deciding what happens to your belongings when you move out 🏠:
* Delete = Throw everything away.
* Retain = Keep your important stuff.
* Snapshot = Take a backup/photo of valuables before leaving.
Pro Tips:
* Always use Retain or Snapshot for data storage resources to avoid accidental loss.
* Can be used in combination with stack updates to preserve critical data.
### CloudFormation – Stack Roles
What it is
* Stack Roles are IAM roles that CloudFormation assumes when creating or updating resources in a stack.
* They define permissions for CloudFormation to perform actions on your behalf.
* Also known as `RoleARN` in a stack template or when creating a stack.
Why it matters
* Security → Limits what CloudFormation can do; avoids using overly permissive credentials.
* Separation of duties → Admins can control which stacks can modify which resources.
* Multi-account deployments → Needed when deploying stacks in other AWS accounts.
* Ensures principle of least privilege for automated deployments.
How it works
1. Create an IAM Role → Give it permissions for the resources CloudFormation will manage.
2. Trust Policy → Allows CloudFormation service to assume the role (`Service: cloudformation.amazonaws.com`).
3. Attach Role to Stack → During stack creation, specify the RoleARN.
4. CloudFormation assumes the role → Performs all resource actions using the role’s permissions.
Components
| Component | Description |
| ---------------- | ---------------------------------------------------------------------- |
| **RoleARN** | The ARN of the IAM role CloudFormation assumes. |
| **IAM Policy** | Permissions attached to the role (S3, EC2, RDS, etc.). |
| **Trust Policy** | Allows `cloudformation.amazonaws.com` to assume the role. |
| **Stack** | The stack that uses the role for creating/updating/deleting resources. |
Example
IAM Role (trust policy for CloudFormation)
```json
{
"Version": "2012-10-17",
"Statement": [
{
"Effect": "Allow",
"Principal": {
"Service": "cloudformation.amazonaws.com"
},
"Action": "sts:AssumeRole"
}
]
}
```
Using the Role in a Stack (CLI example)
```bash
aws cloudformation create-stack \
--stack-name MyStack \
--template-body file://template.yaml \
--role-arn arn:aws:iam::123456789012:role/MyCloudFormationRole
```
Analogy
Think of Stack Role like a key card for a worker 🔑:
* Worker = CloudFormation service
* Key card = IAM role
* Doors/resources = AWS services (EC2, S3, RDS)
* CloudFormation can only access resources permitted by the key card.
Pro Tips:
* Always create least-privilege roles per stack.
* Useful in multi-account setups → stack in one account can create resources in another.
* StackRole is optional, but recommended for security best practices.
### cfn-init
CloudFormationInit and cfn-init are tools which allow a desired state configuration management system to be implemented within CloudFormation
Use the AWS::CloudFormation::Init type to include metadata on an Amazon EC2 instance for the cfn-init helper script. If your template calls the cfn-init script, the script looks for resource metadata rooted in the AWS::CloudFormation::Init metadata key. cfn-init supports all metadata types for Linux systems & It supports some metadata types for Windows
{% embed url="" %}
### cfn-hup
The cfn-hup helper is a daemon that detects changes in resource metadata and runs user-specified actions when a change is detected. This allows you to make configuration updates on your running Amazon EC2 instances through the UpdateStack API action.
Lab CF Template
{% file src="" %}
{% file src="" %}
{% file src="" %}
{% file src="" %}
{% file src="" %}
### **Change Set**
What it is
A Change Set is a preview of the changes AWS CloudFormation will make to your stack before actually applying them.\
Think of it like a *“dry run”* or *“test renovation plan”*.
Why it matters
* Safe updates → Prevent accidental deletion or unwanted changes.
* Visibility → Know exactly what resources will be added, modified, or deleted.
* Collaboration → Teams can review changes before execution.
* Rollback safety → Catch mistakes before they impact production.
How it works
1. You modify your CloudFormation template.
2. Instead of updating the stack directly, you create a Change Set.
3. CloudFormation compares the old and new templates.
4. You get a report showing:
* Resources to be added
* Resources to be modified
* Resources to be deleted
5. You can then execute the change set (apply changes) or discard it.
Components
* Change Set Name → Unique identifier.
* Changes Summary → List of resources that will be created, updated, or deleted.
* Execution Status → Pending, Available, or Executed.
Analogy
Imagine you’re renovating your house:
* The current house = existing stack.
* The new design plan = updated template.
* The renovation preview sheet = change set (tells you what walls will be moved, what’s added, what’s removed).
* Only when you approve the sheet, the builders start work.
Examples / Scenarios
✅ Updating an EC2 instance type → Change set shows "Modify EC2 Instance".\
✅ Adding a new S3 bucket → Change set shows "Add S3 bucket".\
✅ Removing a DynamoDB table → Change set warns it will "Delete DynamoDB table".
Quick Difference vs Normal Update:
| **Update Type** | **Direct Update** | **Change Set** |
| -------------------- | ----------------- | -------------- |
| Safety Preview | ❌ No | ✅ Yes |
| Risk of Mistakes | High | Low |
| Rollback Preparation | Harder | Easier |
| Best Practice | ❌ Not advised | ✅ Recommended |
### **Custom Resource**
What it is
A Custom Resource in AWS CloudFormation lets you extend CloudFormation beyond the AWS services it natively supports.
* It acts as a “hook” to run custom logic when creating, updating, or deleting a stack.
* Backed by a Lambda function (most common) or an SNS topic.
Why it matters
* Lets you do things CloudFormation can’t natively do.
* Automates setup/configurations that require logic.
* Integrates 3rd-party services or external systems.
* Enforces organization-specific rules (security, tagging, governance).
How it works (step by step)
1. You define a Custom::ResourceName in your template.
2. That resource triggers a Lambda function (or SNS) when the stack is created/updated/deleted.
3. The Lambda does some action (e.g., call an API, create a non-supported AWS resource, run validation).
4. The Lambda sends a response back to CloudFormation (`SUCCESS` or `FAILED`).
5. CloudFormation proceeds with the stack execution.
**Components**
* **Custom Resource Definition** → Declared in template with `Type: Custom::MyResource`.
* **ServiceToken** → Points to the Lambda ARN or SNS topic.
* **Lambda Function Code** → Defines the custom logic (create/update/delete).
* **Response** → Lambda must signal back status to CloudFormation (using a pre-signed S3 URL).
**Analogy (Simple)**
Think of CloudFormation as a **restaurant menu**. Normally, you can only order what’s on the menu (AWS-supported resources).
* But what if you want something off-menu?
* The **Custom Resource** is like asking the chef to make a special dish.
* The waiter (CloudFormation) asks the chef (Lambda) to prepare it.
* The chef returns with the dish, and only then does the order proceed.
Examples / Scenarios
✅ Creating a non-supported AWS service resource (e.g., WAF rules before WAF was natively supported).\
✅ Automating account bootstrap tasks (like enabling GuardDuty across multiple accounts).\
✅ Calling 3rd-party APIs (e.g., provisioning a SaaS resource during stack creation).\
✅ Enforcing custom security controls (e.g., ensuring all resources are tagged properly).
**YAML Example**
```yaml
Resources:
MyCustomResource:
Type: Custom::S3Cleaner
Properties:
ServiceToken: arn:aws:lambda:us-east-1:123456789012:function:S3CleanupLambda
BucketName: my-temp-bucket
```
**JSON Example**
```json
{
"Resources": {
"MyCustomResource": {
"Type": "Custom::S3Cleaner",
"Properties": {
"ServiceToken": "arn:aws:lambda:us-east-1:123456789012:function:S3CleanupLambda",
"BucketName": "my-temp-bucket"
}
}
}
}
```
In this example:
* CloudFormation calls the `S3CleanupLambda` function.
* The Lambda might delete files in a bucket or enforce bucket policies.
* It then signals back to CloudFormation whether it succeeded or failed
### Example Temp
{% file src="" %}
{% file src="" %}
{% file src="" %}